
Quick Summary: Understanding your audio jack for headphones is key to clear sound and proper connections. This guide breaks down jack types, troubleshooting common issues, and choosing the right adapter, ensuring you get the best listening experience with simple, practical advice.
Audio Jack for Headphones: Your Essential Beginner’s Guide

Hey everyone, Edward Cavitt here from Headphone Horizon! Ever plug in your favorite headphones, only to get crackly sound, or worse, nothing at all? It’s frustrating, I know! For most of us, the humble audio jack is the unsung hero connecting our music, podcasts, or calls to our ears. But what exactly is this little metal tip, and why does it sometimes cause so much trouble?
Don’t worry if terms like “TRS” or “TRRS” sound like secret codes. I’m here to demystify the audio jack for headphones. Think of me as your friendly guide, helping you understand what’s happening under the hood, so you can enjoy crystal-clear audio without any headaches. We’ll cover everything from what the different parts of the jack do, how to fix common connection problems, and even how to find an adapter if you need one. Let’s get your sound back on track!
What Exactly is an Audio Jack?

At its core, an audio jack is a type of electrical connector that carries audio signals. For your headphones, it’s the metal plug that goes into your phone, laptop, tablet, or audio player. It’s designed to transfer sound from the device to the headphones’ drivers, which then create the sound waves you hear.
These jacks come in a few main sizes, but the most common one you’ll encounter for headphones is the 3.5mm jack, often called a “mini-jack” or “eighth-inch jack.” You’ll see them everywhere, from your smartphone to your desktop computer. They’ve been the standard for decades, making them incredibly versatile.
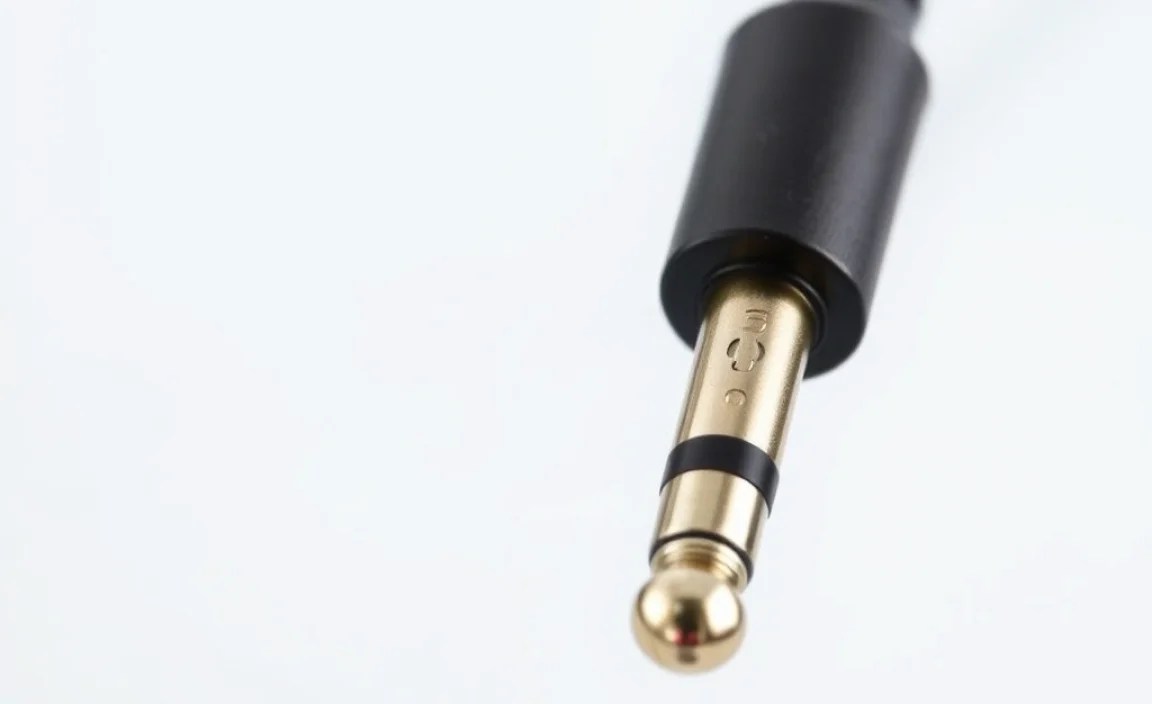
The Anatomy of Your Audio Jack: More Than Just a Stick!

That metal plug on your headphone cable might look simple, but it’s actually made up of several distinct parts, each with a specific job. These parts are separated by insulative rings. The way these conductive sections are arranged determines what kind of signals the jack can carry. Here’s a breakdown of the most common types you’ll find:
TRS (Tip-Ring-Sleeve)
This is the most basic type of audio jack. It has three conductive sections separated by two rings:
- Tip: This is the very end of the plug. It typically carries audio for the left channel in stereo sound.
- Ring: This section is located between the tip and the sleeve. In stereo applications, it carries audio for the right channel.
- Sleeve: This is the longest section at the base of the plug. It usually acts as the common ground for both channels.
Think of TRS jacks as your standard stereo headphone connectors. They are perfect for just listening to audio.
TRRS (Tip-Ring-Ring-Sleeve)
This type is becoming increasingly common, especially on smartphones and newer devices. As the name suggests, it has four conductive sections separated by three rings:
- Tip: Carries the left audio channel.
- First Ring: Carries the right audio channel.
- Second Ring: This is where things get interesting! On most modern smartphones and devices, this section carries the microphone signal from your headphone’s built-in mic.
- Sleeve: Acts as the common ground.
TRRS jacks are what allow you to use headphones with integrated microphones for calls or voice commands. The extra ring enables that two-way communication.
TS (Tip-Sleeve)
These are simpler, with only two conductive sections:
- Tip: Carries the audio signal.
- Sleeve: Acts as the ground.
You’ll rarely see TS jacks for consumer headphones. They are more common in professional audio equipment, like electric guitars, where there’s typically only a mono signal and no need for a microphone or stereo separation.
Common Audio Jack Sizes
While the internal configuration matters, so does the physical size! Here are the most common jack sizes you might encounter:
| Name | Size (mm) | Common Use |
|---|---|---|
| 3.5mm (Mini-Jack) | 3.5mm (approx. 1/8 inch) | Smartphones, laptops, tablets, most consumer headphones, car stereos |
| 6.35mm (1/4 inch) | 6.35mm (approx. 1/4 inch) | Electric guitars, keyboards, amplifiers, home stereo receivers, professional audio equipment |
| 2.5mm (Sub-mini) | 2.5mm (approx. 3/32 inch) | Some older mobile phones, feature phones, cordless phones, some small portable audio devices |
As you can see, the 3.5mm jack is king for headphones in our everyday devices. The 6.35mm (1/4 inch) jack is common for instruments and pro audio gear, and you might need an adapter to connect standard headphones to these. The 2.5mm is less common these days but was prevalent in older portable electronics.
Why Isn’t My Audio Jack Working? Troubleshooting Common Issues
So, you’ve got that frustrating audio problem. Before you rush out and buy new headphones, let’s go through some common culprits and fixes. Often, it’s something simple!
1. Loose Connection
The Problem: The most frequent offender! The plug isn’t seated firmly in the jack. This can cause intermittent sound, crackling, or one earbud cutting out.
The Fix:
- Gently push the headphone plug further into the jack. Make sure it clicks into place or feels snug.
- Wiggle the plug slightly while it’s plugged in. If the sound changes or cuts in and out, you’ve found the issue.
- Try plugging and unplugging a few times. This can sometimes clear out minor debris or reseat the connection.
2. Debris in the Jack
The Problem: Over time, lint, dust, and pocket gunk can accumulate inside the audio jack port on your device. This prevents the plug from making proper contact.
The Fix:
- Turn off your device! This is crucial for safety.
- Visually inspect the jack using a flashlight. Look for any obvious obstructions.
- Gently clean it. Your best tools here are:
- Compressed Air: A quick blast can dislodge loose debris.
- Wooden or Plastic Toothpick: Never use metal. Carefully scrape around the inside edge of the jack.
- Small Insert (like a SIM card tool or a very thin piece of paper rolled into a cone): Again, be gentle and avoid metal.
- After cleaning, try plugging in your headphones again.
Important Note: Always be gentle. Damaging the inside of the audio jack port can be an expensive repair. If you’re uncomfortable, seek professional cleaning.
3. Damaged Headphone Plug or Cable
The Problem: The plug itself might be bent, corroded, or the cable near the plug might be frayed or broken.
The Fix:
- Inspect the plug: Is it visibly damaged, rusty, or bent? If so, the plug might need to be replaced, which usually means replacing the cable or the headphones.
- Check the entire cable: Look for kinks, cuts, or exposed wires, especially near the plug and the earcups/earbuds.
- Test with other headphones: If you have another pair of headphones, try them with your device. If they work fine, the issue is with your original headphones.
For minor fraying near the plug, some hardy DIYers can attempt a repair by stripping and re-soldering the wires. However, this requires soldering skills and is often best left to professionals or avoided if the headphones aren’t valuable.
4. Device Software Glitch
The Problem: Sometimes, the issue isn’t physical. Your device’s software might be confused about whether headphones are plugged in or not.
The Fix:
- Restart your device. This is the classic “turn it off and on again” for a reason – it resets the system and can clear temporary glitches.
- Check audio settings: Ensure your device hasn’t accidentally switched output to an unknown device or muted the headphone jack.
5. Water Damage or Corrosion
The Problem: If your device or headphones have been exposed to moisture, it can lead to corrosion on the jack’s contacts, hindering conductivity.
The Fix:
- If you suspect recent water exposure to the jack port, turn the device off immediately and let it dry completely for at least 48 hours.
- For existing corrosion, you can try the cleaning methods mentioned earlier. Rubbing alcohol (isopropyl alcohol) on a cotton swab can help clean contacts, but make sure it’s very sparingly applied and the port is completely dry before powering on the device.
For water damage, checking official device repair guides or manufacturer support can be helpful. For example, Apple provides guidance on liquid damage for their devices, highlighting the importance of professional assessment.
Understanding Different Jack Configurations: When Your Mic Won’t Work
This is a source of confusion for many. You have a fantastic pair of headphones with a built-in microphone, but when you plug them into your laptop or phone, the mic doesn’t register. Why?
The most common reason is an incompatibility between the headphone’s jack configuration (usually TRRS with a specific pinout) and the device’s jack port configuration.
TRS vs. TRRS Pinouts
Here’s where the “Tip-Ring-Ring-Sleeve” versus “Tip-Ring-Sleeve” really matters:
- Standard Smartphone TRRS (CTIA Standard): This is the most common standard on modern phones and many laptops. The order is typically:
- Tip: Left Audio
- Ring 1: Right Audio
- Ring 2: Ground
- Sleeve: Microphone
- Standard Laptop/Desktop TRS: These jacks are usually stereo only and expect a TRS plug (Left, Right, Ground). Some older or specific laptops might have separate headphone and microphone jacks, both being TRS ports.
- Older/Different TRRS (OMTP Standard): Less common now, but you might encounter this. The order is typically:
- Tip: Left Audio
- Ring 1: Right Audio
- Ring 2: Microphone
- Sleeve: Ground
Notice how the Mic and Ground sections are swapped between CTIA and OMTP TRRS. If your headphones use OMTP and your device expects CTIA (or if your device is a TRS-only jack), the microphone won’t be recognized correctly. The audio will work because Left/Right/Ground are mostly standardized where they appear, but the mic will be dead or the audio will cut out on one side.
The Solution: Adapters!
This is where the magic of adapters comes in. If you have a mismatch, you’ll likely need an adapter:
- TRRS to Dual TRS Adapter: If your laptop has separate headphone and microphone jacks (both expecting TRS), this adapter splits your TRRS headphone plug into two TRS plugs – one for audio out and one for microphone in. These are very common and inexpensive.
- TRRS to TRS Adapter (Basic): If your headphones are TRRS but your device is TRS (e.g., older audio interfaces, some DJ mixers), this adapter might pass audio but typically disables the microphone functionality.
- CTIA to OMTP Adapter (and vice-versa): These are less common for general consumers but exist to bridge the gap between the two TRRS standards if you have very specific legacy gear.
When buying an adapter, always check the product description to ensure it matches your needs. Look for clarity on whether it splits signals, converts standards, or simply adapts a plug size.
Choosing the Right Adapter: A Quick Cheat Sheet
Adapters can seem confusing, but a little knowledge goes a long way. Here’s a quick rundown:
| Your Headphone Plug | Your Device Jack(s) | Needed Adapter Type | What it Does |
|---|---|---|---|
| TRRS (with Mic) | Separate Headphone (TRS) & Microphone (TRS) Jacks | TRRS to Dual TRS Splitter | Splits the TRRS signal into separate stereo audio and mono microphone signals. |
| TRRS (with Mic) | Single Combined Headphone/Mic Jack (TRRS) | None Needed (usually compatible) | Direct connection. If mic doesn’t work, it’s a CTIA/OMTP pinout mismatch or software issue. |
| TRRS (with Mic) | Single Headphone Jack (TRS) | TRRS to TRS Adapter | Connects audio, but microphone usually won’t work. |
| TRS (Stereo Only) | Separate Headphone (TRS) & Microphone (TRS) Jacks | None Needed | Direct connection. |
| TRS (Stereo Only) | Single Combined Headphone/Mic Jack (TRRS) | TRS to TRRS Adapter | Connects audio, but no microphone input from headphones. |
| 3.5mm TRS/TRRS | 6.35mm (1/4 inch) Jack | 3.5mm to 6.35mm Adapter | Adapts the smaller plug to fit the larger jack. Audio only, mic functionality depends on source. |
Always double-check the specs of your headphones and your device. When in doubt, consult the product manuals or the manufacturer’s website.
Maintaining Your Audio Jack for Longevity
Taking care of your audio jack port and your headphone plugs can prevent many issues and extend their lifespan. Here are a few simple tips:
- Be Gentle: Always insert and remove headphones by gripping the plug, not by yanking the cable. Pulling on the cable puts stress on the internal connections, which is a common point of failure.
- Keep it Clean: Regularly clean both your headphone plugs and the device’s audio jack port as described in the troubleshooting section. This is probably the single most effective maintenance tip.
- Avoid Extremes: Don’t expose your device’s audio jack to extreme temperatures, moisture, or physical impact if possible.
- Store Properly: When not in use, wrap your headphone cables loosely (avoid tight wrapping around the plug) or use a headphone case to protect the plugs and cables from damage.
- Consider a Protective Cap: For ports that aren’t used frequently, small rubber or silicone dust caps can prevent debris buildup.
When It’s Time for Professional Help or Replacement
Sometimes, despite your best efforts, the audio jack port on your device or the plug on your headphones might be beyond simple fixes. If you’ve:
- Thoroughly cleaned the port and tried multiple known-good headphones.
- Confirmed your headphones work perfectly on other devices.
- Checked for software issues with a restart.
…and still no luck, it’s likely time to consider your options:
- Device Repair: For smartphones and laptops, a damaged audio jack port often requires professional repair. This can involve precise soldering for experienced technicians. Look for reputable repair shops or, if possible, contact the device manufacturer.
