
Quick Summary: Experiencing audio issues with your gaming headset? This guide offers straightforward, beginner-friendly steps to troubleshoot and fix common problems like no sound, static, or microphone failures. Learn simple solutions to get back in the game without needing expert skills or expensive replacements.
How to Fix Gaming Headset Steps: Genius Solutions for Common Issues

Welcome to Headphone Horizon, where we make understanding your audio gear as clear as your favorite track! If you’ve been in the middle of an epic gaming session, only to have your sound cut out or your mic go dead, you know how frustrating that can be. It feels like your entire digital world just went quiet. But before you start mourning your favorite headset or shelling out for a new one, take a deep breath. Many common gaming headset problems have surprisingly simple fixes. This guide is designed to walk you through these solutions step-by-step, turning those frustrating moments into quick wins. You don’t need to be a tech wizard to bring your headset back to life!
Understanding Common Gaming Headset Problems
Gaming headsets are complex pieces of tech, but the issues they face are often rooted in simple connections, software glitches, or minor wear and tear. Recognizing the specific problem is the first step to fixing it.
No Sound Coming From the Headset
This is perhaps the most common and infuriating issue. You’re ready to dive into a game, but all you hear is silence. It can be cause by several things, from a simple muted volume to a deeper connection problem.
Static or Distorted Audio
Crackling, popping, or a general fuzziness can make crucial in-game audio unlistenable and even painful. This often points to interference, poor connections, or driver issues.
Microphone Not Working or Poor Quality
Being able to communicate with your teammates is vital in most multiplayer games. If your mic is silent, picking up background noise, or sounds like you’re speaking through a tin can, it needs attention.
One Ear Cup Not Working
This can be a sign of a damaged wire, a loose connection, or even a problem with the audio balance settings on your device.
Step-by-Step Troubleshooting Guide
Let’s get your audio back on track! We’ll start with the easiest fixes and move towards more involved troubleshooting. Remember to try each step patiently.
Step 1: The Basic Checks (Don’t Skip These!)
Often, the solution is the simplest. Before you panic, run through these essential checks:
- Check the Mute Button: Many headsets have an in-line mute button or a physical switch on the ear cup. Ensure it’s not accidentally engaged.
- Volume Control: Verify that the headset’s volume wheel or slider isn’t turned all the way down. Also, check the master volume on your PC or console. For PC users, right-click the speaker icon in your system tray, select “Open Volume mixer,” and ensure your headset isn’t muted or set to a very low volume there either.
- Secure Connections: For wired headsets, unplug and firmly replug the audio jack into your device. For wireless headsets, ensure the USB dongle (if applicable) is securely inserted.
- Power Source (Wireless Headsets): Make sure your wireless headset is adequately charged or that its battery compartment has fresh batteries.
Step 2: Test on a Different Device
This is a crucial diagnostic step. If your headset works perfectly on a different computer, gaming console, or even a smartphone, the problem likely lies with your original device’s settings or ports, not the headset itself.
- Connect to another PC/Console: Plug your headset into a different gaming system or computer.
- Listen for Sound/Test Mic: See if audio comes through and if your microphone is detected and functional on this new system.
If it works on another device:
The issue is with your original computer or console. Proceed to Step 3 (for PC) or Step 4 (for Console). You might need to check your device’s audio settings or troubleshoot USB ports.
If it doesn’t work on another device:
This strongly suggests the problem is with the headset itself. Continue to Step 5 for more headset-specific checks.
Step 3: PC Specific Troubleshooting
If your headset isn’t working on your PC, software and driver issues are often the culprits.
Check Audio Output and Input Settings
Windows and macOS have specific settings to choose which audio device is active.
- For Windows:
- Right-click the speaker icon in the system tray (usually bottom right of your screen).
- Select “Sounds” or “Open Sound settings.”
- Under the “Playback” tab (in the older Sound control panel) or “Output” section (in newer Settings), ensure your gaming headset is selected as the default playback device.
- Go to the “Recording” tab or “Input” section, and make sure your headset’s microphone is set as the default recording device.
- For macOS:
- Go to System Preferences > Sound.
- Click on the “Output” tab and select your headset.
- Click on the “Input” tab and select your headset’s microphone.
Update or Reinstall Audio Drivers
Drivers are software that allow your operating system to communicate with your hardware. Corrupted or outdated drivers can cause audio problems.
- Find Device Manager (Windows): Type “Device Manager” in the Windows search bar and open it.
- Locate Audio Devices: Expand “Sound, video and game controllers.”
- Update Driver: Right-click on your audio device (which might be your motherboard’s audio or a specific headset driver if installed) and select “Update driver.” Choose “Search automatically for drivers.”
- Reinstall Driver: If updating doesn’t work, try right-clicking and selecting “Uninstall device.” Then, restart your PC. Windows will usually attempt to reinstall the driver automatically upon reboot. If not, you may need to download the latest drivers from your motherboard manufacturer’s website (for onboard audio) or your headset manufacturer’s website.
For more detailed driver information, consult Microsoft’s official guide on driver updates: Microsoft Support – Update drivers in Windows.
Check for Software Interference
Sometimes, background applications can conflict with audio devices.
- Close unnecessary background programs.
- If you have custom software for your headset (e.g., from SteelSeries, Logitech, Corsair), try running it as an administrator or reinstalling it.
Step 4: Console Specific Troubleshooting
Gaming consoles like PlayStation, Xbox, and Nintendo Switch have their own audio settings.
Check Console Audio Settings
- PlayStation (PS4/PS5): Go to Settings > Devices > Audio Devices. Ensure your headset is selected as the Input Device and Output Device. Check the “Volume control (Headphones)” and ensure it’s not too low.
- Xbox (One/Series X/S): Go to Settings > General > Volume & audio output. Under “Party chat output,” ensure your headset is selected. Under “Speaker audio,” ensure “Headset format” is set to “Stereo uncompressed” for basic compatibility, or a more advanced format if your headset supports it.
- Nintendo Switch: Plug your headset into the audio jack. Go to System Settings > Console > Volume. Check if the volume is adjusted correctly.
Check Controller Port (if wired)
If your headset connects through your game controller, try plugging it into a different controller port or a direct USB port on the console if available. Ensure the controller itself is updated.
Reset Paring (if wireless)
For wireless headsets connected via Bluetooth or a proprietary dongle, try resetting the pairing process. Refer to your headset’s manual on how to enter pairing mode and then re-pair it with your console.
Step 5: Headset-Specific Hardware Checks
If the headset failed tests on other devices or the software/hardware checks on your PC/console didn’t resolve it, it’s time to look closely at the headset itself.
Inspect the Cables and Connectors
This is vital for wired headsets.
- Wires: Carefully examine all visible wires for kinks, fraying, or exposed copper. Pay close attention to the point where the wire meets the earcups and the connector.
- Connector (3.5mm Jack): Look for any bent pins or debris inside the metal tip. Gently clean with a dry cotton swab if you see dust.
- USB Connectors: Check for bent pins or damage on USB plugs.
Clean the Headset and Connections
Dust and debris can interfere with connections and even microphones.
- Use a dry, soft brush or compressed air to clean around the audio jack and any other ports.
- Gently clean the earcups and padding.
Test the Microphone Boom (if detachable)
If your microphone boom is detachable, try removing it and then reattaching it firmly. Sometimes a loose connection here can cause issues.
Internal Component Issues (Advanced/If Comfortable)
For those comfortable with it, an internal issue might be present. This could involve a loose wire inside an earcup or near the headband adjustment. However, opening a headset often voids warranties and can lead to further damage if not done carefully. Unless you are experienced, it’s usually best to avoid this step and consider professional repair or replacement.
Step 6: Software and Firmware Updates (Dedicated Software)
Many gaming headsets come with proprietary software that allows for customization and updates. This software is crucial for keeping your headset running optimally.
- Download Software: Visit the official website of your headset manufacturer (e.g., Logitech G, HyperX, Razer, SteelSeries) and download the latest version of their control software that matches your headset model.
- Install and Run: Install the software and connect your headset. The software should be able to detect it.
- Check for Firmware Updates: Within the software, look for an option like “Firmware Update” or “Device Settings.” If an update is available, follow the on-screen instructions carefully. Do not unplug the headset or close the software during the update process.
Keeping firmware up-to-date is a proactive way to ensure compatibility and fix known bugs. You can often find documentation or FAQs on the manufacturer’s support pages, similar to what you’d find on RTINGS.com’s comprehensive guides covering headphone technology and maintenance.
Step 7: Resetting the Headset
Some advanced headsets have a reset function, similar to rebooting a computer. This can clear out temporary glitches.
- Check Manual: Consult your headset’s user manual for specific reset instructions. This might involve holding down a combination of buttons for a set period while the headset is connected or powered on.
- If no Manual: Search online for “[Your Headset Model] reset” to find instructions.
When to Consider Professional Repair or Replacement
Despite your best efforts, some problems are beyond DIY fixes.
Signs You Might Need a New Headset
- Physical Damage: Obvious cracks in the headband, broken hinges, or severely damaged earcups (beyond simple cleaning).
- Water or Liquid Damage: If your headset has been exposed to liquids, internal components can corrode, leading to irreparable damage.
- Persistent Issues: If you’ve gone through all the troubleshooting steps and the problem persists, it’s likely an internal hardware failure.
- Intermittent but Widespread Problems: For example, if both channels (left and right) are consistently crackling, or if the mic is always garbled, it could indicate a more significant internal fault.
Where to Look for Repair Services
If your headset is still under warranty, contacting the manufacturer is your first step. If not, you could look for local electronics repair shops. However, for most gaming headsets, the cost of professional repair might approach the cost of a new, entry-level to mid-range model. For the latest in audio science and repair advice for audio equipment in general, resources like The Audio Engineering Society (AES) provide invaluable industry insights, though finding specific guides for consumer headsets can be challenging.
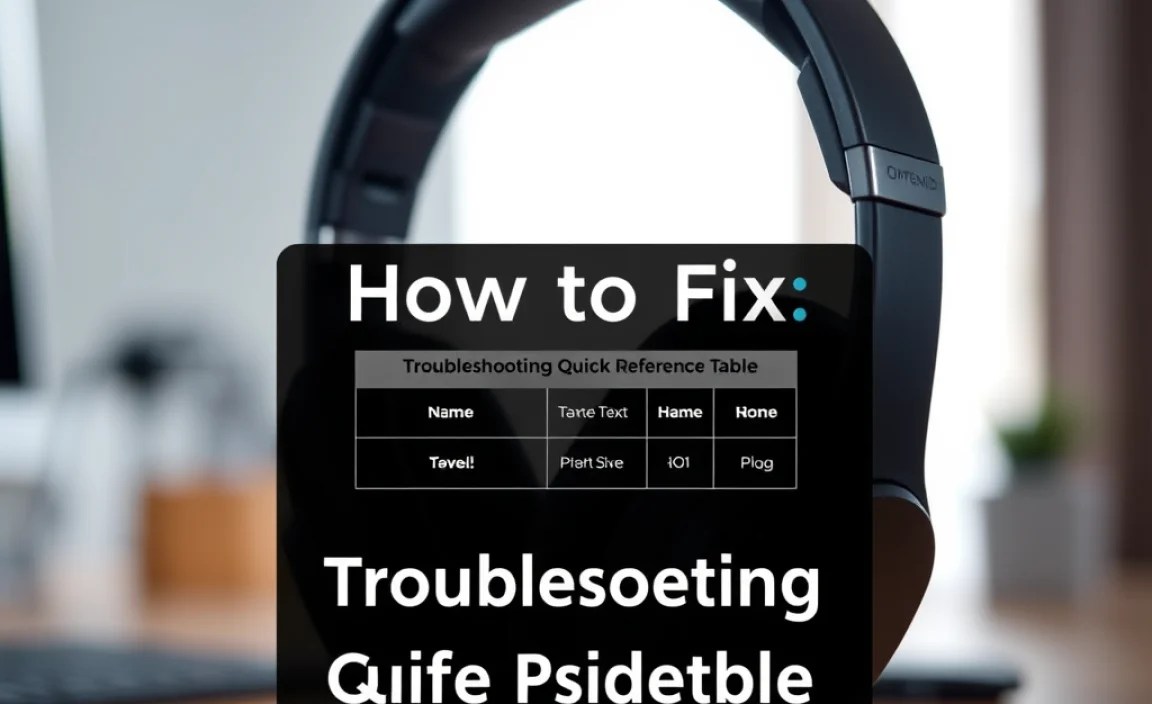
Troubleshooting Quick Reference Table
Here’s a handy look-up guide for common issues and their likely solutions.
| Problem | Likely Cause(s) | First Steps to Try | More Advanced Steps |
|---|---|---|---|
| No Sound | Muted, Low Volume, Incorrect Output Device, Loose Cable, Driver Issue | Check mute button, volume, secure connections, test on another device | Update/reinstall audio drivers, check PC/console audio settings, firmware update |
| Static/Distortion | Interference, Loose Connection, Driver Issue, Damaged Cable | Secure connections, test on another device, check for physical cable damage | Update/reinstall audio drivers, test PC’s USB ports, firmware update |
| Mic Not Working | Muted Mic, Incorrect Input Device, Driver Issue, USB Port Issue, Physical Obstruction | Check mic mute switch, secure connection, test on another device | Update/reinstall audio/microphone drivers, check PC/console mic settings, firmware update, clean mic port |
| One Ear Cup Silent | Loose Cable (internal or external), Balance Setting, Driver Issue | Rotate plug slightly, check audio balance in OS (PC), secure connections | Test on another device, firmware update, potential internal cable issue |
Frequently Asked Questions (FAQ)
Let’s tackle some common questions beginners might have.
Q1: My headset worked yesterday, but now it has no sound. What’s the most likely reason?
A1: The most common reasons for this sudden change are simple settings. Double-check that your headset hasn’t been accidentally muted via an in-line control or software setting, and ensure the volume isn’t turned down. Also, verify it’s still selected as the default audio output device in your computer or console’s sound settings.
Q2: Can I use my gaming headset with my phone?
A2: Most gaming headsets have a 3.5mm audio jack or USB-C connector that is compatible with smartphones. However, if your headset uses a proprietary USB dongle or requires specific software, it might not work directly with a phone without an adapter or specific app.
Q3: My microphone sounds muffled. What can I do?
A3: First, check if your microphone boom is in the correct position and firmly attached. Ensure there’s no debris obstructing the microphone grille. Then, check your operating system’s microphone settings; sometimes, noise cancellation features can over-process the audio. Update your headset’s drivers and firmware if available.
Q4: How do I know if my gaming headset is broken beyond repair?
A4: If you’ve tried troubleshooting on multiple devices, checked all connections, updated drivers and firmware, and the headset still doesn’t work correctly, it’s likely an internal hardware failure. Extreme physical damage or signs of liquid ingress also point towards it being irreparable.
Q5: My headset connects via USB but isn’t detected by my PC. What should I try?
A5: Try plugging the USB dongle or cable into a different USB port on your PC. If you’re using a USB hub, try connecting directly to the PC. Restarting your PC can also resolve temporary connection glitches. Ensure you have the correct drivers or companion software installed for your headset.
Q6: How often should I update my headset’s firmware?
A6: While not always necessary every day, it’s a good practice to check for firmware updates periodically, especially if you encounter new audio or microphone issues. Manufacturers release updates to fix bugs, improve performance, and add new features. Checking every few months or when a problem arises is a reasonable approach.
