
Quick Summary: Learn how to wire a 3.5mm headphone jack with this beginner-friendly guide. We cover essential tools, step-by-step instructions, common wiring configurations, and troubleshooting tips to help you successfully connect your headphones. Get your audio working like new!
Wiring for a 3.5mm Headphone Jack: Your Essential Beginner’s Guide

Hello audio adventurers! Edward Cavitt here from headphonehorizon. Ever find yourself with a beloved pair of headphones whose connector has seen better days, or perhaps you’re diving into a DIY audio project? The 3.5mm headphone jack, that ubiquitous little connector, is the heart of your personal listening experience. While it might seem a bit technical at first glance, understanding how to wire one is surprisingly achievable. This guide is designed to demystify the process, turning what might feel like a complex task into a straightforward, confidence-building project. We’ll walk through everything you need to know, from the tools to the final solder, ensuring your trusty headphones get a new lease on audio life. Let’s get your sound flowing again!
Why Wire Your Own 3.5mm Headphone Jack?

Before we grab our soldering irons, let’s consider why you might embark on this journey. It’s not just about fixing things; it’s about empowering yourself with knowledge and extending the life of your favorite audio gear. Here are a few compelling reasons:
- Repairing Damaged Cables: The most common reason! If your headphone cable is frayed, kinked, or the jack has simply broken off, a simple rewire can save you from buying a new pair.
- Customization and Upgrades: Want a longer cable? A more durable one? Or perhaps you’re integrating a headphone jack into a custom speaker or audio device? Wiring your own allows for complete personalization.
- Saving Money: Professional repair services or replacement cables can be pricey. A DIY approach is often significantly more cost-effective, especially for higher-end headphones.
- Learning and Skill Building: It’s a fantastic way to learn basic electronics and soldering skills, which can be applied to many other projects. It’s incredibly rewarding to fix something yourself!
- Sustainability: Repairing instead of replacing is a more environmentally friendly choice. Giving your headphones a second life reduces electronic waste.
Understanding the 3.5mm Headphone Jack

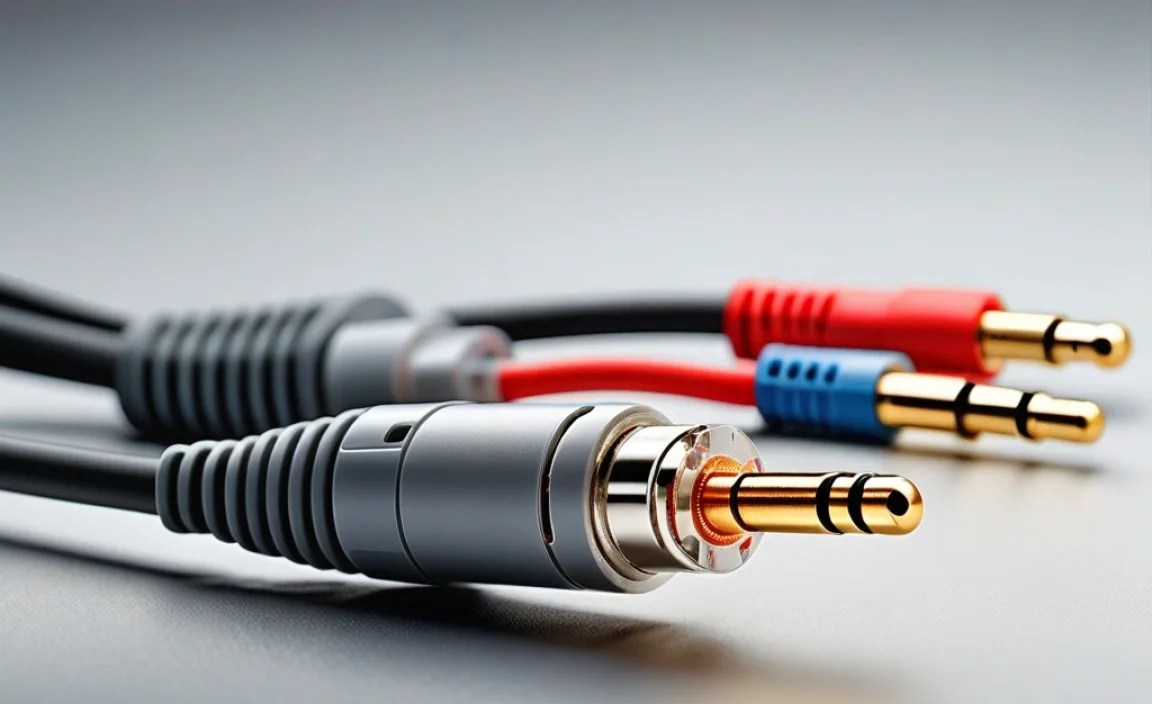
The 3.5mm headphone jack, also known as a 1/8-inch TRS (Tip, Ring, Sleeve) connector, is a standard for analog audio signals. It typically carries stereo sound and sometimes microphone input. Understanding its parts is key to successful wiring.
A standard stereo 3.5mm plug has three main contact points, each connected to a different part of the audio signal:
- Tip (T): This is the very end of the plug. It usually carries the left audio channel.
- Ring (R): This is the section just behind the tip. It typically carries the right audio channel.
- Sleeve (S): This is the longest section at the base of the plug. It serves as the common ground for both audio channels and, in some configurations, for the microphone.
For headphones with a built-in microphone (often called TRRS – Tip, Ring, Ring, Sleeve), there’s an additional ring:
- Tip (T): Left audio
- Ring 1 (R1): Right audio
- Ring 2 (R2): Ground
- Sleeve (S): Microphone signal (or sometimes ground, depending on the standard)
We’ll primarily focus on the common TRS (stereo) configuration for this guide, as it’s the most prevalent for headphones. However, the principles can be extended to TRRS if you identify the correct wires.
Essential Tools and Materials
Gathering the right tools before you start makes the process much smoother and safer. Don’t worry if you don’t have everything; many of these are common in basic electronics or can be acquired affordably.
Tools You’ll Need:
- Soldering Iron: A temperature-controlled iron is best, but a basic 25-40 watt iron will work for this task.
- Solder: Use rosin-core solder suitable for electronics. A 60/40 tin/lead or lead-free solder is common.
- Wire Strippers: For safely removing insulation from the headphone wires. A fine-gauge wire stripper is ideal.
- Wire Cutters: Small, sharp cutters for trimming wires.
- Helping Hands (Optional but Recommended): A stand with clips to hold the jack and wires steady while you solder.
- Heat Shrink Tubing: Assorted small sizes to insulate the soldered connections and provide strain relief.
- Heat Gun or Lighter: To shrink the heat shrink tubing.
- Magnifying Glass (Optional): Helpful for seeing small wires and solder joints.
- Multimeter (Optional but Recommended): For testing continuity and identifying wires if they aren’t color-coded.
Materials You’ll Need:
- Replacement 3.5mm Headphone Jack: Ensure it’s a stereo (TRS) or TRRS jack, whichever your headphones require. You can find these online or at electronics stores. Many come with a housing that screws together, making assembly easier.
- Headphone Cable: The cable from your headphones that you’re repairing.
Step-by-Step Guide to Wiring Your 3.5mm Headphone Jack

Let’s get down to business! Follow these steps carefully, and you’ll have your headphones singing again in no time.
Step 1: Prepare the Existing Cable
First, you need to access the wires inside your headphone cable. Identify the point where the original jack broke off or where you plan to install the new one. You’ll need to cut the cable cleanly, leaving enough length to comfortably work with.
- Cut the Cable: Using sharp wire cutters, make a clean cut on the headphone cable where the old jack was attached or where you intend to attach the new one.
- Strip Outer Sheathing: Carefully use a hobby knife or wire strippers (set to a shallow depth) to remove about 1 to 1.5 inches of the outer rubber or plastic sheathing of the headphone cable. Be very careful not to nick or cut the inner wires.
- Expose Inner Wires: Beneath the outer sheathing, you’ll find the core wires. These are typically insulated with different colored plastics. You’ll usually see a bundle of wires, often with a thicker, uninsulated wire or a few strands twisted together serving as the common ground.
Step 2: Identify the Wires
This is a crucial step. Headphone cables can have various wire colorings, and sometimes they aren’t standard. The goal is to identify which color corresponds to the Tip (left audio), Ring (right audio), and Sleeve (ground).
Common Wire Color Codes (May Vary!):
- Green: Often Left Audio
- Red or Blue: Often Right Audio
- Copper/Uninsulated: Often Ground
- White or Yellow (in TRRS): Often Microphone
If you have a multimeter: This is where it becomes very helpful. Set your multimeter to continuity mode (it usually beeps when there’s a connection). Touch one probe to the metal of what was the tip of the old jack (or the part that touched the left earbud’s signal), and then touch the other probe to the ends of each inner wire. The wire that makes a connection (beeps) is your left audio. Repeat this for what was the ring of the old jack (right earbud’s signal) to find the right audio wire. The remaining wire, usually uninsulated or braided around the others, is your ground.
If you don’t have a multimeter: You’ll have to rely on common color codes. If your headphones have a standard stereo jack, you’re typically looking for three conductors. If it’s a TRRS jack with a microphone, you’ll have four conductors (including ground). For a standard stereo setup, assume Green = Left, Red/Blue = Right, and Copper = Ground. If unsure, carefully examine the old jack if possible – sometimes the terminals are even labeled.
Step 3: Prepare the Inner Wires
Once identified, you need to prepare the ends of the inner wires for soldering. Each conductor wire will have a thin plastic insulation. You need to strip just enough insulation to expose about 3-5mm of the copper wire.
- Strip Individual Wires: Using your fine-gauge wire strippers, carefully remove the insulation from the end of each identified wire (left, right, ground). Be very gentle to avoid breaking the thin copper strands.
- Tin Each Wire: This makes soldering to the jack much easier. Apply a small amount of solder to the tip of each exposed copper wire. This is called “tinning.”
Step 4: Prepare the New Headphone Jack
Most replacement jacks come in parts: the metal plug tip, the internal solder terminals, and the outer housing. You’ll need to assemble some of this before soldering.
- Disassemble the Jack: Unscrew or pull apart the outer housing of the new headphone jack.
- Identify Solder Terminals: Look at the solder terminals inside the jack. Typically, there will be one for the tip, one for the ring, and one for the sleeve. They are usually arranged to correspond with the plug’s sections.
- Tin Solder Terminals (Optional but Recommended): You can apply a tiny bit of solder to each terminal on the jack to make attaching the wires easier.
Step 5: Solder the Wires to the Jack
This is the core of the process. You’ll be soldering the tinned ends of your headphone wires to the corresponding solder terminals on the new jack.
- Secure the Jack: Use a helping hands tool or clamp to firmly hold the headphone jack in place.
- Solder Ground First: It’s often easiest to start with the ground wire (usually uninsulated copper). Apply the tinned end of the ground wire to the corresponding sleeve terminal on the jack. Heat both the wire and the terminal with the soldering iron and quickly touch the solder to them. The solder should flow smoothly. Remove the solder and then the iron. You want a clean, shiny joint, not a dull, blobby one.
- Solder Left Audio: Solder the wire identified as left audio (Tip) to the tip terminal on the jack.
- Solder Right Audio: Solder the wire identified as right audio (Ring) to the ring terminal on the jack.
- Check for Bridges: Visually inspect your solder joints. Ensure there are no stray strands of wire or solder connecting different terminals (this is called a solder bridge and will cause shorts).
Step 6: Insulate and Assemble
Once the soldering is complete and you’ve checked your work, it’s time to insulate the connections and reassemble the jack housing.
- Apply Heat Shrink Tubing: Before reassembling the housing, slide a small piece of heat shrink tubing over each soldered wire leading to the jack. These should be just large enough to cover the solder joint. (Some people apply larger pieces over all connections after soldering).
- Test Before Sealing: If possible, plug the headphones into a device and test both left and right channels. If it works, proceed. If not, you’ll need to re-check your soldering and wire identification.
- Shrink Tubing: Carefully use a heat gun or a lighter (with caution!) to shrink the tubing over each solder joint, providing insulation and strain relief.
- Assemble the Housing: Screw or snap the outer housing of the headphone jack back together around the newly soldered connections. Ensure the cable enters the housing properly.
- Strain Relief: Many jacks have a strain relief mechanism (a rubber boot or a clamping nut). Make sure this is properly seated to prevent the cable from pulling directly on the solder joints.
Step 7: Final Testing
You’ve done it! Now, plug your newly wired headphones into a device and play some music. Test both the left and right channels, and if you rewired a microphone jack, test that too.
- Listen Carefully: Pay attention to the sound quality. Does it sound clear? Are there any crackles or pops?
- Check for Issues: If you hear distortion, no sound, or only one channel, revisit your solder joints and wire connections. A loose connection or a short circuit is the most common culprit.
Wiring Configurations & Diagrams
To make things even clearer, here are some common wiring configurations. Understanding these can help immensely, especially when dealing with less common cables or devices.
Standard Stereo (TRS) 3.5mm Jack: This is for headphones that only output audio, left and right channels.
| Plug Section | Wire Color (Common) | Function |
|---|---|---|
| Tip (T) | Green / White | Left Audio Channel |
| Ring (R) | Red / Blue | Right Audio Channel |
| Sleeve (S) | Copper / Uninsulated / Braided | Ground |
Stereo with Microphone (TRRS) 3.5mm Jack: This is common for smartphone headsets with integrated microphones.
There are two main TRRS standards: CTIA (Cellular Telecommunications Industry Association) and OMTP (Open Mobile Terminal Platform). CTIA is more common on newer devices.
| Plug Section | CTIA Standard Wire Color (Common) | OMTP Standard Wire Color (Common) | Function |
|---|---|---|---|
| Tip (T) | White / Green | White / Green | Left Audio Channel |
| Ring 1 (R1) | Red / Blue | Red / Blue | Right Audio Channel |
| Ring 2 (R2) / Sleeve (S) on OMTP | Ground | Ground | Ground |
| Sleeve (S) / Ring 2 (R2) on OMTP | Black / Yellow (Mic) | Black / Yellow (Ground) | Microphone Signal (CTIA) OR Ground (OMTP) |
Important Note on TRRS: If you are wiring a TRRS jack, especially for a microphone, ensure you understand which standard (CTIA or OMTP) your device uses. Most modern smartphones use CTIA. If you wire it incorrectly, your microphone might not work, or the audio channels might be swapped.
Troubleshooting Common Issues
Even with careful work, things can sometimes go wrong. Here are a few common problems and how
